How to Set a GLD Alpha Era WatchUpdated 3 months ago
How to Set a GLD Alpha Era Watch
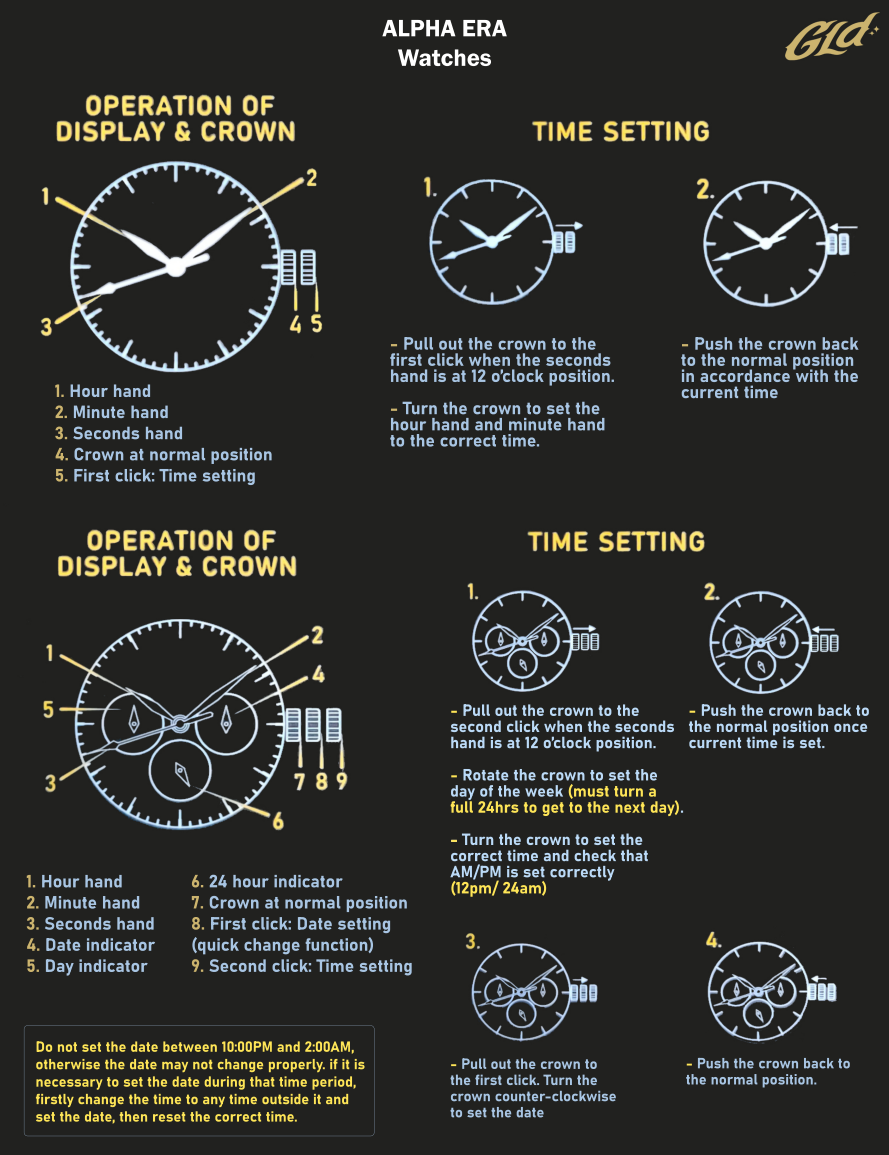
GLD Alpha Era Watch Setup Guide: Time-Only Display
Step 1: Familiarize Yourself with the Watch Components
- The Hour Hand on a watch is the shortest and broadest hand. It completes a full rotation on the dial every 12 hours.
- The Minute Hand is also broad and slightly longer than the Hour Hand. It completes a full rotation around the dial every 60 minutes.
- The Second Hand is the longest and thinnest hand. It completes a full rotation every 60 seconds.
- The Crown has two positions: the Normal Position, which is the default for regular use, and the 1st Click Position, which is used for setting the time.
Step 2: Setting the Time
To accurately set the time on your watch, follow these steps:
-
Pull the Crown to the 1st Click Position: Ensure the seconds hand is at the 12 o'clock position before pulling the crown.
-
Set the Time: Rotate the crown to adjust the hour and minute hands to the correct time.
-
Return the Crown to Normal Position: Push the crown back to the Normal Position after setting the time.
GLD Alpha Era Watch Setup Guide: Time, Date, and Day Display
Step 1: Familiarize Yourself with the Watch Components
- The Hour Hand on a watch is the shortest and broadest hand. It completes a full rotation on the dial every 12 hours.
- The Minute Hand is also broad and slightly longer than the Hour Hand. It completes a full rotation around the dial every 60 minutes.
- The Second Hand is the longest and thinnest hand. It completes a full rotation every 60 seconds.
-
The Date Indicator shows the current date. It advances once every 24 hours, usually at midnight.
-
The Day Indicator displays the current day of the week. Like the Date Indicator, it advances once every 24 hours.
-
The 24-Hour Indicator helps distinguish between AM and PM hours by completing one full rotation every 24 hours.
-
The Crown has three positions: the Normal Position, which is the default for regular use; the 1st Click Position, used for quickly changing the date; and the 2nd Click Position, used for setting the time and day."
Step 2: Setting the Time and Date
-
Pull the Crown to the 2nd Click Position: Ensure the seconds hand is at the 12 o'clock position before pulling the crown.
-
Set the Day and Time: Rotate the crown to set the day of the week, then adjust the hour and minute hands to the correct time. Ensure the AM/PM is correctly set (12pm/24am).
-
Set the Date: Push the crown to the 1st Click Position. Then rotate the crown counterclockwise to adjust the date.
-
Return the Crown to Normal Position: Push the crown back to the Normal Position after all settings are complete.
IMPORTANT: Avoid setting the date between 10:00 PM and 2:00 AM to prevent potential issues with the date change. If necessary, change the time to outside this range, adjust the date, and then reset the correct time.
You can also refer to the diagram below: